Zoushigaya Cemetery
From Shin Megami Tensei IMAGINE Wiki
| Zoushigawa Cemetery | |
|---|---|
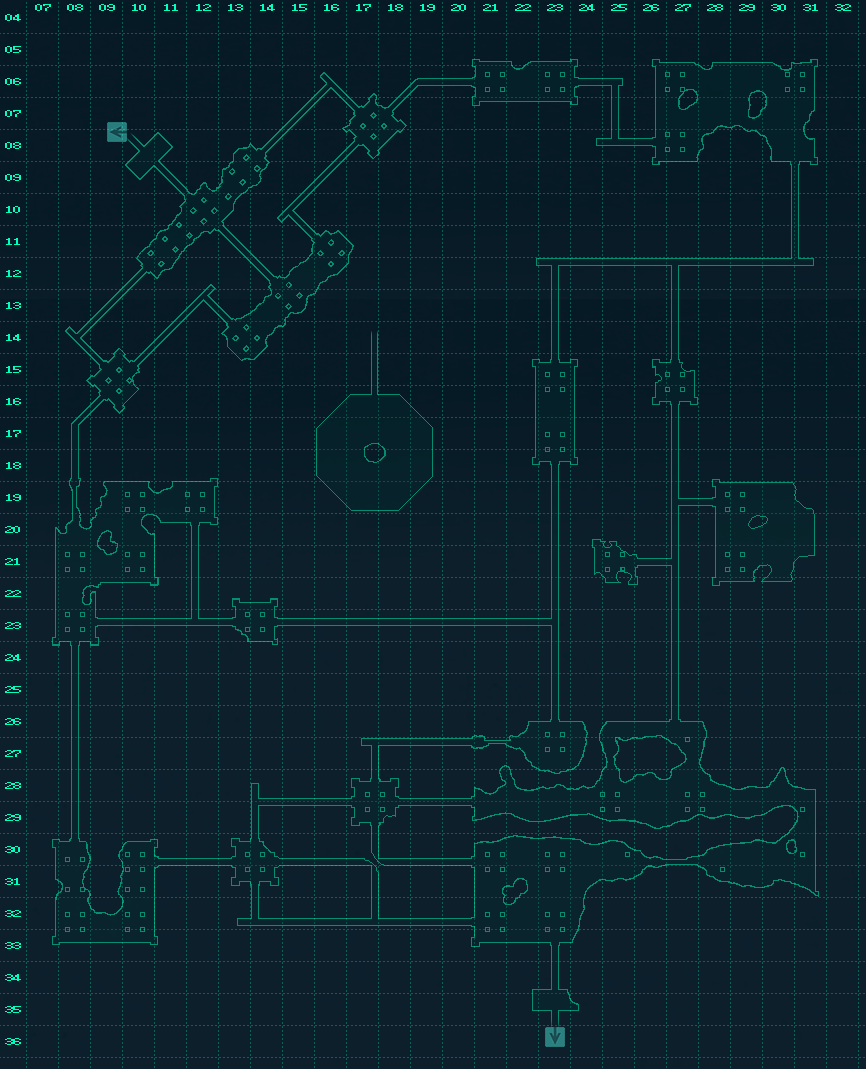
| Exit(s) | Ikebukuro (10,08) Ikebukuro (23,36) (leads to Ichigaya) |
An open "dungeon" in a strange cemetery. Almost all enemies are highly aggressive and fast.
Contents |
Entry Requirements
- C-Class DB License - Obtained from Act 7: DB License
- Must have completed New World
- Main gate: Ikebukuro South area (X23, Y22)
- Back gate: Ikebukuro South area (X24, Y25) and it leads to Ichigaya (X16, Y15)
Map
| Grid Map of Zoushigaya Cemetery |
|---|
|
| Detailed Map of Zoushigaya Cemetery |
|---|
|
| Zoushigaya Cemetery Maze A Map |
|---|
|
| Zoushigaya Cemetery Maze B Map |
|---|
|
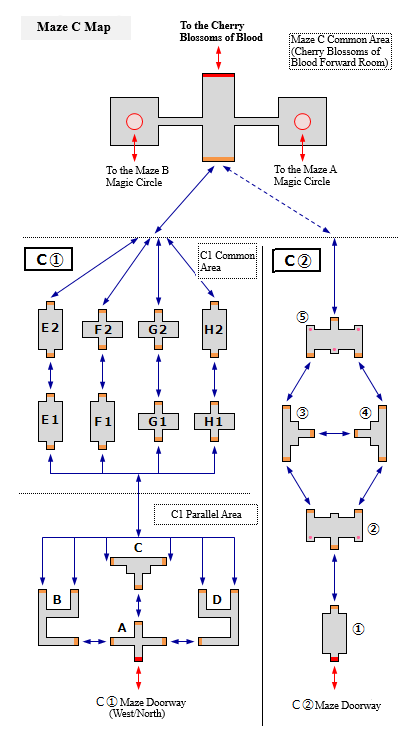
| Zoushigaya Cemetery Maze C Map |
|---|
|
NPCs
- Lily-livered Punk (X12, Y12, 18:00-06:00)
- Speak to this NPC to receive the quest Shadow Standing in the Crimson Evening
- Conductor (X13, Y32)
- Speak to this NPC to receive the Xuan Wu Plugin
Warp Maze
- When entering the blue dark passageway, the message "Tinged ringing..." is displayed and you warp to a maze with no displayed map.
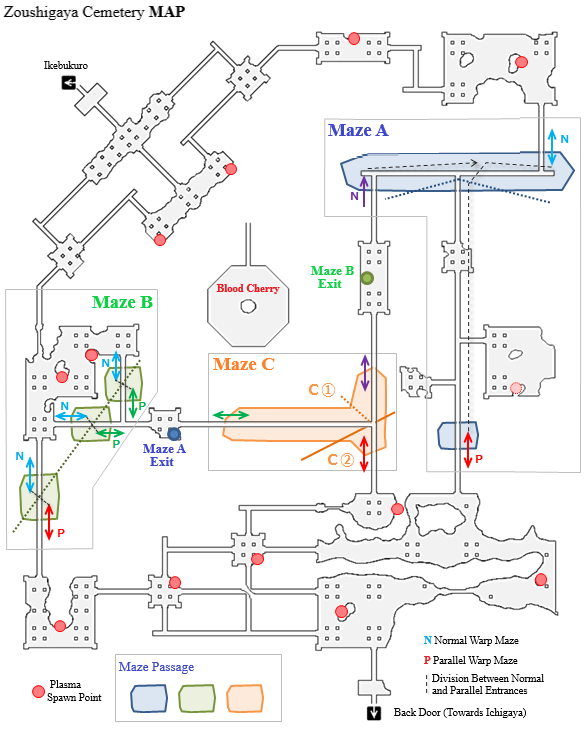
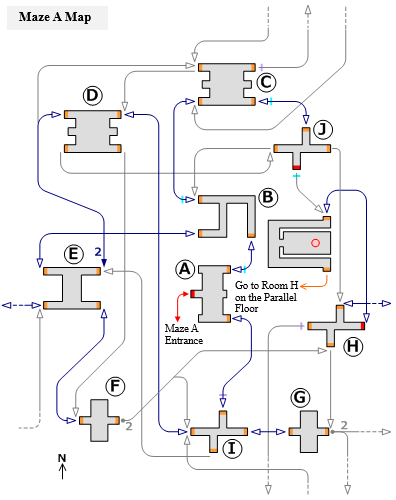
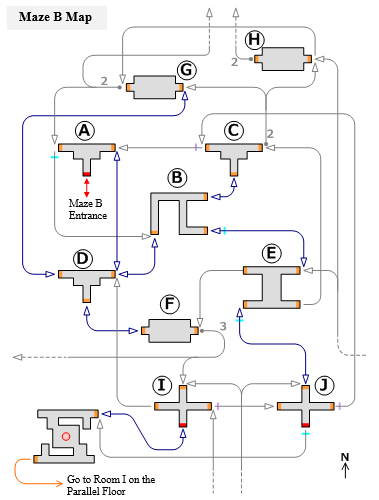
- The layout of the warp maze depends on which of the three sections you enter from (Maze A in the NE, Maze B in the West, and Maze C is in the center) and its enemies vary depending on the time of day.
- The three warp mazes are further divided into normal and parallel sections depending on which entry point you use. These are functionally the same and will lead you through the same areas and to the same teleportation circles, but they will change where the normal entrance and exit of the maze will put you when entering and exiting.
- If you make a mistake and go back you may not necessarily reenter the same room as before.
- There is a magic circle drawn on the floor of some rooms, and when you step on it will warp you out of the maze. This may only put you in a cut off area of the Zoushigaya Cemetery where your only choice is to reenter the maze.
- When you touch the skeleton head found in each room, a tone sounds. The number of times the tone rings out allows you to determine how many rooms away you are from the Cherry Blossoms of Blood. The sound only plays one time and if you touch the same skeleton again it remain silent. (If you move to another zone and come back you can hear the sound again)
Conditions to open the back gate
- Possession of Ikebukuro MAP (Quest "unreasonable world" reward)
- It is necessary to exit Zoushigaya Cemetery via the back gate by navigating from the northern area to the southern area before the "Haunting Punk Leader" will talk to you about granting entry.
- Talk with "Haunting Punk Leader" in front of the back gate (Ikebukuro : X24, Y25) and answer his questions. The answers are as follows: Gods of Destruction, Blood Cherry, and full moon.
- Answering the Haunting Punk Leader's questions correctly will give you the valuable item Tally: Virgo.
- Getting to the southern area of Zoushigaya Cemetery can be tricky will likely take repeated attempts.
- Sometimes when leaving the warp maze via normal means or via a magic circle you can pass through an entrance to a warp maze without being warped. There are areas that can only be entered this way.
- If exiting the circle in the northeastern warp maze (Maze A) head east. If you pass through without being warped then head south.
- If exiting from the circle in the western warp maze (Maze B) head south. If you pass through without being warped continue to head south.
- In both cases you may be moved into a new warp maze (Maze C2). Simply turn around and head back out to exit to the southern area.
- Alternative routes like heading North from the Maze B exit and going through the Maze A occupied area before heading straight South all the way to the Southern section of the cemetery can also be possible as the game allows.
- In rare instances it is possible to exit the Cherry Blossoms of Blood into warp zone C2 instead of C1. The conditions are unknown. (Information requested)
The Cherry Blossoms of Blood (Boss Area)
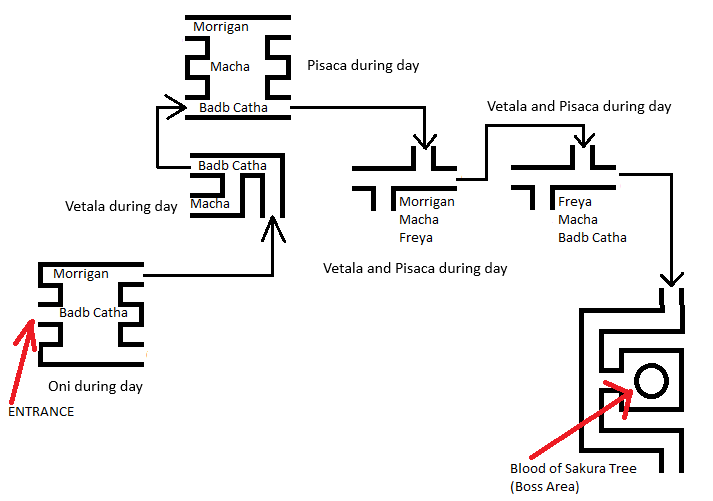
If you enter Maze A from the North East section of the map (x31,y8 roughly) you can use the map below to aid you in making it to boss area quickly:
| Map to the Sakura Tree |
|---|
|
- Upon exiting through the magic circle you will be placed at the Maze A exit at x14,y23 on the map. From here take a right and head East into another warp maze area (Maze C1).
- In this section of the warp maze nearly all routes lead you to The Cherry Blossoms of Blood zone. Just take the most direct route.
- Once you get to the final room the exit you are looking for glows a bright pink. This will take you to the cherry tree.
- You can fight the boss up to 20 times per day per character.
- Give 10 Element [Dark Orb] to the Tree to enter an instance with the boss.
- The enemies around the tree before and during the boss fight drop Element [Dark Orb].
- When starting the fight the enemies around the tree will be replaced. Kill them all to proceed to the next phase.
- In the next phase the enemies will be replaced with Loa and among them there will be a singular boss that you need to kill.
- Each boss monster you kill spawns another boss and several more Loa somewhere in the herds of Loa.
- They spawn in the order of Reaper Hel, Reaper Mot, Reaper Beiji Weng, Reaper Chernobog, Lord of the Blood Sea Loa (Identifiable as being larger than the other Loa), and Saturday Baron Guedhe.
- The spawn animations after killing a boss give away where you can locate the next boss.
- The reward chests do not spawn until all the remaining Loa are killed as well.
- Every boss and the reward chest will drop an Umbilical Box. You can get 7 per run.
- Guedhe's plugin item, Luxuria Rum, has a chance of being in the reward box as well as in the Umbilical Boxes.
- Authentic Records of Hell, needed for the Enhanced Beiji Weng plugin, may also drop during this fight or from Umbilical Boxes.
Field Bosses
- Throughout the field red plasma has a chance of showing up.
- When interacted with a Reaper from the Cherry Blossoms of Blood fight will show up along with a handful of Loa. The Reaper will drop an Umbilical Box upon its defeat.
- While in Warp Maze C you will occasionally receive a message indicating that a special demon has spawned. These demons will appear in one of the C1 common area rooms. They are the Invited by Blood Hecate, Invited by Blood Moloch, and Lost in Blood Phantom. They will also drop an Umbilical Box upon defeat.
- Additionally, Fiend Alice can spawn in the C1 Parallel Area under unknown conditions related to the C1 common area bosses. (Information requested)
- Within warp maze C2 there are 5 red plasmas whose purpose and function remain unknown. (Information requested)
Demons
Normal Spawns
- Pisaca
- Resident of the Cemetery Datsue-Ba
- Resident of the Cemetery Oni
- Resident of the Cemetery Yomotsu-Shikome
- Resident of the Cemetery Yomotsu-Ikusa
- Resident of the Cemetery Vetala
- Resident of the Blood Sea Nue
- Resident of the Blood Sea Turdak
- Resident of the Blood Sea Chatterskull
- Resident of the Blood Sea Legion
- Resident of the Blood Sea Loa
- Resident of the Blood Sea Shadow
- Resident of the Blood Sea Kikuri-Hime
- Resident of the Blood Sea Kumbhanda
Daytime Spawns
Nighttime Spawns
Spawns in Areas Without Map
- One Who Stands on the Verge of Death Freya
- One Who Stands on the Verge of Death Dis
- One Who Stands on the Verge of Death Macha
- One Who Stands on the Verge of Death Badb Catha
- One Who Stands on the Verge of Death Morrigan
- One Who Stands on the Verge of Death Valkyrie
Spawns Around Blood Tree
Special Demons
Boss
- Reaper Hel
- Reaper Mot
- Reaper Beiji Weng
- Reaper Chernobog
- Lord of the Blood Sea Loa
- Saturday Baron Guede
Notes
- Special thanks to "(# ゚ Д ゚) Punsco!" for their blog post documenting the area and their work making highly detailed maps.
- Successfully gaining access to the back gate will allow you to warp there with an Ariadne's Thread.
- Completing the side quest "Shadow Standing in the Crimson Evening", a quest which requires you to learn how to reach every part of Zoushigaya Cemetery, will allow you to use Ariadne's Thread to warp straight to the Cherry Tree.