Difference between revisions of "Sandbox-14"
m (Automatic page editing) |
(→Shinagawa Team Formation (Formatting): Done I guess.) |
||
| Line 117: | Line 117: | ||
=WILDCAT test= | =WILDCAT test= | ||
{{WILDCATD}} | {{WILDCATD}} | ||
| + | |||
| + | =Abnormal Status Test= | ||
| + | {{Status}} | ||
| + | <noinclude> | ||
| + | <div style="clear:both;"></div> | ||
| + | <pre><nowiki> | ||
| + | {{Status | ||
| + | |Generated = | ||
| + | |Type = | ||
| + | |Affinity = | ||
| + | |Description = | ||
| + | |Commentary = | ||
| + | }} | ||
| + | </nowiki></pre> | ||
| + | </noinclude> | ||
| + | |||
| + | =Expertise= | ||
| + | {{Expertise}} | ||
| + | |||
| + | <noinclude> | ||
| + | <div style="clear:both;"></div> | ||
| + | <pre><nowiki> | ||
| + | {{Expertise | ||
| + | |Skill name = | ||
| + | |Type = | ||
| + | |Affinity = | ||
| + | |Action Type = | ||
| + | |Cost = | ||
| + | |Description = | ||
| + | |Commentary = | ||
| + | }} | ||
| + | </nowiki></pre> | ||
| + | </noinclude> | ||
| + | |||
| + | =mttable id test for [[Diaspora Shinagawa]] keys= | ||
| + | {{Diaspora_SHINAGAWA_KEY}} | ||
| + | |||
| + | =Shinagawa Team Formation (Formatting)= | ||
| + | Credit: domosquawk | ||
| + | |||
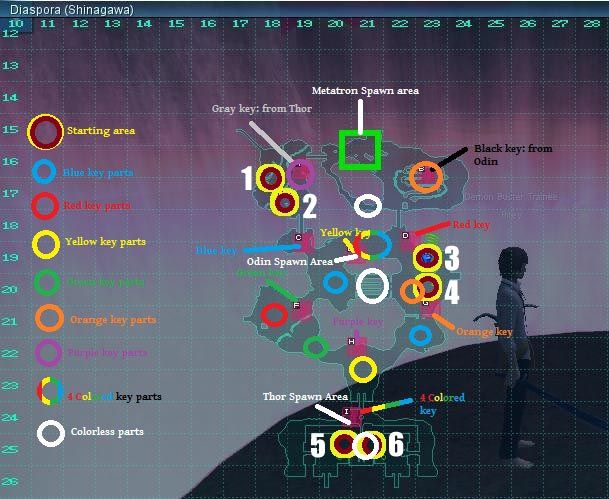
| + | '''IMPORTANT: Check your team number based on your spawn point labeled on the map below''' | ||
| + | {{PhotoL | ||
| + | | anchor = | ||
| + | | picture = http://i676.photobucket.com/albums/vv125/domosquawk/Megaten/teams.jpg | ||
| + | | description = Team coordination place | ||
| + | }} | ||
| + | {| class ="collapsible collapsed" border="0" cellpadding="2" cellspacing="0" width="100%" | ||
| + | ! style="font-size:16px; background:#99ccff;" text-align="center" | Long version | ||
| + | |- | ||
| + | | | ||
| + | '''Team 1: Pillar D, <span style="color:#FF0000">Red</span> Farmers and Virtue Team''' | ||
| + | #Party leader should set the loot rule to Free-for-All, and say in team chat, "we have red", so that the diaspora leader knows you are leading that team. Read the rest of the steps below and communicate them to your team as necessary. | ||
| + | #Farm 10 colorless key pieces in the northern colorless area. | ||
| + | #Next, farm 10 red key pieces near the catacombs entrance. Mix 10 red keys. | ||
| + | #Send 1 delegate to pillar D with all 10 mixed keys to suppress the pillar. When the delegate is in position with the 10 mixed red keys, he/she must say in team chat "D is ready." The delegate will be responsible for suppressing pillar D five times upon the command of the diaspora leader. The delegate sent to D will join the dominion team and stay close by to suppress pillar D throughout the battle if it becomes unsuppressed again. | ||
| + | #The rest of you are the virtue team, if you are overpowered, send any extra people to the Metatron spawn area, the rest will stay and fight the virtues near the catacombs. Somebody from Team 6 will pass you some mixed green keys to suppress pillar F later on if needed. | ||
| + | |||
| + | '''Team 2: Pillar H (& B), <span style="color:#800080">Purple</span> Farmers and Throne Team''' | ||
| + | #Party leader should set the loot rule to Free-for-All, and say in team chat, "we have purple", so that the diaspora leader knows you are leading that team. Read the rest of the steps below and communicate them to your team as necessary. | ||
| + | #Farm 5 purple key pieces from near your spawn point. | ||
| + | #Next, farm 10 colorless pieces from the northern colorless area. Mix 5 purple keys and send 1 delegate to stay with them at pillar H to suppress the pillar. Pillar H must always be suppressed. (Send somebody who will remain alert, but may not have the strongest attacks as there is nothing to kill at pillar H.) When this delegate in is position at pillar H with their mixed keys, they must say in team chat, "H is ready". | ||
| + | #Bring the remaining 5 of your colorless pieces to pillar E and wait for Team 5 to arrive. When it is time, you will help Team 5 defeat the first Odin, and then take the black key piece to pillar B. | ||
| + | #Mix your black key piece with a colorless piece. Coordinate with the diaspora leader and the pillar A delegate to spawn Metatron with your mixed black key. (You should have 1 mixed black key and 4 remaining colorless pieces). | ||
| + | #You will be the throne team. If you are overpowered, send any extra people to fight Metatron. The rest of you will stay at B for the remainder of the battle. Somebody from the Odin team will bring extra black keys pieces to you that you can mix with your extra colorless pieces. You can use these to suppress pillar B if it becomes unsuppressed. | ||
| + | |||
| + | '''Team 3: Pillar I (& A), Four-Color Farmers and Thor Team''' | ||
| + | #Party leader should set the loot rule to Free-for-All, and say in team chat, "we have four-color", so that the diaspora leader knows you are leading that team. Read the rest of the steps below and communicate them to your team as necessary. | ||
| + | #Farm 10 four-colored key pieces near pillar E. | ||
| + | #Next, farm 15 colorless pieces in middle colorless area (by the yagiya). | ||
| + | #Mix 10 four-colored keys and go to pillar I. When you are ready with 10 mixed four-colored keys and at pillar I, the party leader must say in team chat "I is ready." | ||
| + | #Await instructions from the diaspora leader to suppress your pillar 5 times. Once that is done, keep the remaining 5 mixed four-colored keys to suppress pillar I if it becomes unsuppressed. | ||
| + | #You will be the Thor party. If you are overpowered, send some extra people to help fight Metatron. Keep your other 5 colorless pieces to mix gray keys when Thor drops them. Choose a delegate to run the [u]mixed[/u] gray keys to pillar A continually throughout the run in case it needs to be unsuppressed. (Send somebody who will remain alert, but may not have the strongest attacks as there is nothing to kill at pillar A.) This delegate will coordinate with Team 2 and the diaspora leader to suppress pillar A at the right time to summon Metatron. | ||
| + | |||
| + | '''Team 4: Pillar C & G, <span style="color:#FFA500">Orange</span> and <span style="color:#0000FF">Blue</span> Farmers, Dominion Team''' | ||
| + | #Party leader should set the loot rule to Free-for-All, and say in team chat, "we have orange & blue", so that the diaspora leader knows you are leading that team. Read the rest of the steps below and communicate them to your team as necessary. | ||
| + | #Farm 10 colorless keys from the middle colorless area (by the yagiya). | ||
| + | #Next, farm 5 orange keys and 5 blue keys from near your original spawn point. | ||
| + | #Send 1 delegate from your team to pillar C with 5 mixed blue keys; send 1 delegate to pillar G with 5 mixed orange keys. The Party leader must report in team chat when your delegates are in position with the mixed keys by saying "C and G ready." | ||
| + | #Await instructions from the diaspora leader to suppress your pillars 5 times. Make sure the delegates at these pillars remain alert! | ||
| + | #After the keys have been used, the delegate at C can head back to the rest of the party. You are the Dominion team. If you are overpowered, send any extra people to fight Metatron. The rest of you will stay at the Dominion spawn area for the remainder of the battle. Pillars C & G are not critical, so they don't necessarily need to be continually unsuppressed. | ||
| + | |||
| + | '''Team 5: Pillar E, <span style="color:#E1E132">Yellow</span> Farmers and Odin team''' | ||
| + | #Party leader should set the loot rule to Free-for-All, and say in team chat, "we have yellow", so that the diaspora leader knows you are leading that team. Read the rest of the steps below and communicate them to your team as necessary. | ||
| + | #Farm 10 yellow key pieces near pillar H. | ||
| + | #Next, farm 10 colorless pieces in southern colorless area. | ||
| + | #Mix 10 yellow keys and go to pillar E. When you are ready with 10 mixed yellow keys and at pillar I, the party leader must say in team chat "E is ready." | ||
| + | #Await instructions from the diaspora leader to suppress your pillar 5 times. Once that is done, keep the remaining 5 mixed yellow keys to suppress pillar E if it becomes unsuppressed. | ||
| + | #You will be the Odin party. If you are overpowered, send some extra people to help fight Metatron. Choose 1 person to run the extra black keys pieces (unmixed) to pillar B and trade them to the throne team continually throughout the run in case it needs to be unsuppressed. The rest of you stay at Pillar E and fight Odin for the remainder of the battle.[/list] | ||
| + | |||
| + | '''Team 6: Pillar F, <span style="color:#347C17">Green</span> Farmers and Metatron Party''' | ||
| + | #Party leader should set the loot rule to Free-for-All, and say in team chat, "we have green", so that the diaspora leader knows you are leading that team. Read the rest of the steps below and communicate them to your team as necessary. | ||
| + | #Farm 10 colorless pieces in southern colorless area. | ||
| + | #Next, farm 10 green key pieces between pillars F & H. | ||
| + | #Mix 10 green keys and go to pillar F. When you are ready with 10 mixed green keys and at pillar F, the party leader must say in team chat "F is ready." | ||
| + | #Await instructions from the diaspora leader to suppress your pillar 5 times. Once that is done, trade somebody from the virtue team the remaining 5 mixed green keys to suppress pillar F if it becomes unsuppressed. | ||
| + | #You will be the Metatron party. Head to the Metatron spawn area at the north of the map, and kill the boss...but beware...the millenarianism! | ||
| + | |||
| + | '''Diaspora Leader''' | ||
| + | *After making the team outside diaspora at the Gomory, you will have to be the leader inside. You will be in charge of making sure that everyone is communicating and doing their jobs effectively. Make sure you know a contact person from each party, so you know who to ask about progress. Take note when they announce their colors. You should probably have somebody else in your party lead your team color farming so that you can focus on communication in team chat. When the time comes, you will give the order to use keys at CDE, FGI and AB. You should also help to re-direct any individual people if some teams are underpowered or too overpowered. In the instructions above, all extra people head toward Metatron. You should exercise the ability to send some of those people to help teams that need assistance. | ||
| + | |- | ||
| + | |} | ||
| + | |||
| + | {| class ="collapsible collapsed" border="0" cellpadding="2" cellspacing="0" width="100%" | ||
| + | ! style="font-size:16px; background:#ff9999;" text-align="center" | Short version | ||
| + | |- | ||
| + | | | ||
| + | '''Team 1: Pillar D, <span style="color:#FF0000">Red</span> Farmers and Virtue Team''' | ||
| + | #Say in team chat, "we have red" | ||
| + | #Farm 10 colorless pieces (north) | ||
| + | #Farm 10 red key pieces | ||
| + | #Send 1 delegate to pillar D with all 10 mixed keys; say in team chat "D is ready" | ||
| + | #You are the virtue team | ||
| + | |||
| + | '''Team 2: Pillar H (& B), <span style="color:#800080">Purple</span> Farmers and Throne Team''' | ||
| + | #Say in team chat, "we have purple" | ||
| + | #Farm 5 purple key pieces | ||
| + | #Farm 10 colorless pieces (north) | ||
| + | #Mix 5 purple keys and send with 1 delegate to pillar H; say in team chat, "H is ready" | ||
| + | #Bring the remaining 5 of your colorless pieces to pillar E. Help Team 5 defeat the 1st Odin; take the black key piece | ||
| + | #Mix a black key; coordinate with pillar A to spawn Metatron with your key. | ||
| + | #You are the throne team | ||
| + | |||
| + | '''Team 3: Pillar I (& A), Four-Color Farmers and Thor Team''' | ||
| + | #Say in team chat, "we have four-color" | ||
| + | #Farm 10 four-colored key pieces | ||
| + | #Farm 15 colorless pieces (middle) | ||
| + | #Mix 10 four-colored keys and go to pillar I; say in team chat "I is ready." | ||
| + | #You will be the Thor party. | ||
| + | #Choose a delegate to run the <u>mixed</u> gray keys to pillar A continually; coordinate with pillar B to summon Metatron. | ||
| + | |||
| + | '''Team 4: Pillar C & G, <span style="color:#FFA500">Orange</span> and <span style="color:#0000FF">Blue</span> Farmers, Dominion Team''' | ||
| + | #Say in team chat, "we have orange & blue" | ||
| + | #Farm 10 colorless keys (middle) | ||
| + | #Farm 5 orange keys and 5 blue keys | ||
| + | #Send 1 delegate to pillar C with 5 mixed blue keys; send 1 delegate to pillar G with 5 mixed orange keys; say in team chat "C and G ready" | ||
| + | #You are the Dominion team. | ||
| + | |||
| + | '''Team 5: Pillar E, <span style="color:#E1E132">Yellow</span> Farmers and Odin team''' | ||
| + | #Say in team chat, "we have yellow" | ||
| + | #Farm 10 yellow key pieces | ||
| + | #Farm 10 colorless pieces (south) | ||
| + | #Mix 10 yellow keys and go to pillar E; say in team chat "E is ready" | ||
| + | #You will be the Odin party. | ||
| + | #Choose 1 person to run the extra black keys pieces (unmixed) to pillar B continually. | ||
| + | |||
| + | '''Team 6: Pillar F, <span style="color:#347C17">Green</span> Farmers and Metatron Party''' | ||
| + | #Say in team chat, "we have green" | ||
| + | #Farm 10 colorless pieces (south) | ||
| + | #Farm 10 green key pieces | ||
| + | #Mix 10 green keys and go to pillar F; say in team chat "F is ready." | ||
| + | #You will be the Metatron party and/or help other underpowered parties | ||
| + | |- | ||
| + | |} | ||
Revision as of 10:55, 2 April 2012
Link test [1]
Contents |
Moon-phase DCM template
| DCM Of {{{Place}}} | |||
|---|---|---|---|
| New Moon | {{{New Moon}}} | ||
| 1/8 Moon | {{{1/8 Moon}}} | ||
| 2/8 Moon | {{{2/8 Moon}}} | ||
| 3/8 Moon | {{{3/8 Moon}}} | ||
| Half Moon | {{{Half Moon}}} | ||
| 5/8 Moon | {{{5/8 Moon}}} | ||
| 6/8 Moon | {{{6/8 Moon}}} | ||
| 7/8 Moon | {{{7/8 Moon}}} | ||
| Full Moon | {{{Full Moon}}} | ||
{{DCM_Moon
|Place                     =
|New Moon              =
|1/8 Moon               =
|2/8 Moon               =
|3/8 Moon               =
|Half Moon              =
|5/8 Moon              =
|6/8 Moon              =
|7/8 Moon              =
|Full Moon              =
}}
STEVEN Reward template
| Floor {{{Number}}} reward | |||
|---|---|---|---|
| Normal reward | {{{Normal}}} | ||
| Rare reward | {{{Rare}}} | ||
{{STEVEN_R
|Number =
|Normal =
|Rare =
}}
STEVEN Floor x3 test
| Floor {{{number}}} | ||||
|---|---|---|---|---|
| Picture | ||||
| {{{Picture}}} | ||||
| Demon Numbers | {{{Demon Numbers}}} | |||
| HP | {{{HP}}} | |||
| Weakness | {{{Weakness}}} | |||
| Macca | {{{Macca}}} | |||
| Magnetite | {{{Magnetite}}} | |||
| XP | {{{XP}}} | |||
| Note | {{{Note}}} | |||
| Floor {{{number2}}} | ||||
| Picture | ||||
| {{{Picture2}}} | ||||
| Demon Numbers | {{{Demon Numbers2}}} | |||
| HP | {{{HP2}}} | |||
| Weakness | {{{Weakness2}}} | |||
| Macca | {{{Macca2}}} | |||
| Magnetite | {{{Magnetite2}}} | |||
| XP | {{{XP2}}} | |||
| Note | {{{Note2}}} | |||
| Floor {{{number3}}} | ||||
| Picture | ||||
| {{{Picture3}}} | ||||
| Demon Numbers | {{{Demon Numbers3}}} | |||
| HP | {{{HP3}}} | |||
| Weakness | {{{Weakness3}}} | |||
| Macca | {{{Macca3}}} | |||
| Magnetite | {{{Magnetite3}}} | |||
| XP | {{{XP3}}} | |||
| Note | {{{Note3}}} | |||
| Floor {{{NumberR}}} reward | ||||
| Normal reward | {{{NormalR}}} | |||
| Rare reward | {{{RareR}}} | |||
{{STEVEN-3
<!-- Starting Floor -->
|number                  =
|Picture                  =
|Demon Numbers      =
|HP                        =
|Weakness              =
|Macca                   =
|Magnetite              =
|XP                        =
|Note                     =
<!-- Second Floor -->
|number2                  =
|Picture2                 =
|Demon Numbers2      =
|HP2                        =
|Weakness2              =
|Macca2                   =
|Magnetite2              =
|XP2                        =
|Note2                     =
<!-- Boss Floor -->
|number3                  =
|Picture3                  =
|Demon Numbers3      =
|HP3                        =
|Weakness3              =
|Macca3                   =
|Magnetite3              =
|XP3                        =
|Note3                     =
<!-- Reward -->
|NumberR =
|NormalR =
|RareR =
}}
STEVEN Floor x2 test
| Floor {{{number}}} | ||||
|---|---|---|---|---|
| Picture | ||||
| {{{Picture}}} | ||||
| Demon Numbers | {{{Demon Numbers}}} | |||
| HP | {{{HP}}} | |||
| Weakness | {{{Weakness}}} | |||
| Macca | {{{Macca}}} | |||
| Magnetite | {{{Magnetite}}} | |||
| XP | {{{XP}}} | |||
| Note | {{{Note}}} | |||
| Floor {{{number2}}} | ||||
| Picture | ||||
| {{{Picture2}}} | ||||
| Demon Numbers | {{{Demon Numbers2}}} | |||
| HP | {{{HP2}}} | |||
| Weakness | {{{Weakness2}}} | |||
| Macca | {{{Macca2}}} | |||
| Magnetite | {{{Magnetite2}}} | |||
| XP | {{{XP2}}} | |||
| Note | {{{Note2}}} | |||
| Floor {{{NumberR}}} reward | ||||
| Normal reward | {{{NormalR}}} | |||
| Rare reward | {{{RareR}}} | |||
{{STEVEN-2
<!-- Starting Floor -->
|number                  =
|Picture                  =
|Demon Numbers      =
|HP                        =
|Weakness              =
|Macca                   =
|Magnetite              =
|XP                        =
|Note                     =
<!-- Boss Floor -->
|number2                  =
|Picture2                 =
|Demon Numbers2      =
|HP2                        =
|Weakness2              =
|Macca2                   =
|Magnetite2              =
|XP2                        =
|Note2                     =
<!-- Reward -->
|NumberR =
|NormalR =
|RareR =
}}
WILDCAT test
| Suginami Tunnel | ||||||||
|---|---|---|---|---|---|---|---|---|
| Plate/Party | Time limit | Rank A | Rank B | Rank C | ||||
| Clear Time | SP Earned | Clear Time | SP Earned | Clear Time | SP Earned | |||
| Bronze | 1 | 20:00 | 14:38:62 | 136 | 08:25:68 | 99 | ||
| 2 | 19:00 | 13:51:68 | 168 | 11:41:46 | 152 | 05:53:50 | 108 | |
| 3 | 18:00 | 13:40:43 | 191 | 10:47:26 | 166 | 03:24:96 | 102 | |
| 4 | 17:00 | |||||||
| 5 | 16:00 | |||||||
| Sliver | 1 | 26:00 | 17:17:62 | 413 | ||||
| 2 | 24:30 | 13:06:75 | 420 | |||||
| 3 | 23:00 | 13:18:25 | 483 | 10:49:06 | 428 | 07:17:62 | 349 | |
| 4 | 21:30 | 10:45:81 | 463 | |||||
| 5 | 20:00 | |||||||
| Gold | 1 | 42:00 | 29:41:78 | 708 | 21:19:12 | 591 | 07:48:89 | 301 |
| 2 | 40:00 | 29:57:92 | 832 | 23:56:50 | 702 | 14:16:73 | 492 | |
| 3 | 38:00 | 26:14:84 | 839 | 21:58:00 | 735 | |||
| 4 | 36:00 | 25:23:84 | 879 | |||||
| 5 | 34:00 | 26:54:05 | 986 | |||||
| Celu Tower | ||||||||
|---|---|---|---|---|---|---|---|---|
| Plate/Party | Time limit | Rank A | Rank B | Rank C | ||||
| Clear Time | SP Earned | Clear Time | SP Earned | Clear Time | SP Earned | |||
| Bronze | 1 | 22:00 | 16:12 | 205 | 12:36:78 | 151 | ||
| 2 | 21:00 | 15:19:39 | 208 | 13:56:62 | 196 | |||
| 3 | 20:00 | 15:12 | 272 | 12:52:46 | 209 | |||
| 4 | ||||||||
| 5 | ||||||||
| Sliver | 1 | 27:00 | 19:33 | 648 | 09:14:75 | 353 | ||
| 2 | 26:30 | 18:23:57 | 636 | 11:21:18 | 468 | 09:20:14 | 420 | |
| 3 | 25:00 | 15:41 | 749 | 11:55:43 | 545 | |||
| 4 | ||||||||
| 5 | 22:00 | 13:33:45 | 689 | 08:46:43 | 538 | |||
| Gold | 1 | 64:00 | 29:31:93 | 919 | 22:47:93 | 754 | ||
| 2 | 61:00 | 45:06:25 | 1501 | |||||
| 3 | 58:00 | 40:25:79 | 1534 | |||||
| 4 | 55:00 | |||||||
| 5 | 52:00 | 36:37:65 | 1651 | |||||
| Shibuya Quartz | ||||||||
|---|---|---|---|---|---|---|---|---|
| Plate/Party | Time limit | Rank A | Rank B | Rank C | ||||
| Clear Time | SP Earned | Clear Time | SP Earned | Clear Time | SP Earned | |||
| Bronze | 1 | 24:00 | 13:10:68 | 241 | ||||
| 2 | ||||||||
| 3 | ||||||||
| 4 | ||||||||
| 5 | ||||||||
| Sliver | 1 | 8:00 | 5:12:65 | 105 | ||||
| 2 | 7:30 | 4:39:43 | 116 | 01:50:80 | 91 | |||
| 3 | 7:00 | 4:15:21 | 123 | |||||
| 4 | ||||||||
| 5 | ||||||||
| Gold | 1 | 6:00 | 3:10:67 | 107 | ||||
| 2 | ||||||||
| 3 | ||||||||
| 4 | ||||||||
| 5 | ||||||||
| Old Ichigaya Camp | ||||||||
|---|---|---|---|---|---|---|---|---|
| Plate/Party | Time limit | Rank A | Rank B | Rank C | ||||
| Clear Time | SP Earned | Clear Time | SP Earned | Clear Time | SP Earned | |||
| Bronze | 1 | 14:00 | 10:00:87 | 115 | ||||
| 2 | 13:30 | 10:00:21 | 141 | |||||
| 3 | 13:00 | 9:13:00 | 150 | |||||
| 4 | ||||||||
| 5 | ||||||||
| Sliver | 1 | 14:00 | 10:16:15 | 183 | 8:07 | 162 | ||
| 2 | 13:30 | |||||||
| 3 | ||||||||
| 4 | ||||||||
| 5 | ||||||||
| Gold | 1 | 14:00 | 9:53:71 | 232 | ||||
| 2 | ||||||||
| 3 | ||||||||
| 4 | ||||||||
| 5 | ||||||||
| Ueno Mirage | ||||||||
|---|---|---|---|---|---|---|---|---|
| Plate/Party | Time limit | Rank A | Rank B | Rank C | ||||
| Clear Time | SP Earned | Clear Time | SP Earned | Clear Time | SP Earned | |||
| Bronze | 1 | 26:00 | 14:56:68 | 350 | 13:59:53 | 335 | ||
| 2 | 25:00 | 13:10:54 | 398 | 11:58:56 | 376 | |||
| 3 | 23:00 | 13:14:45 | 456 | 10:05:81 | 390 | 3:42:09 | 255 | |
| 4 | ||||||||
| 5 | ||||||||
| Sliver | 1 | 40:00 | ||||||
| 2 | 38:00 | 30:18:93 | 857 | 19:17:06 | 614 | |||
| 3 | 36:00 | 17:45:37 | 649 | |||||
| 4 | 34:00 | |||||||
| 5 | 32:00 | 24:05:06 | 937 | |||||
| Gold | 1 | |||||||
| 2 | ||||||||
| 3 | 76:00 | 37:17:53 | 1687 | |||||
| 4 | ||||||||
| 5 | 68:00 | 54:58:50 | 2773 | |||||
Abnormal Status Test
| Generated: | • - |
| Type: | • - |
| Affinity: | • - |
| Description: | • - |
| Commentary: | • - |
{{Status
|Generated       =
|Type              =
|Affinity           =
|Description      =
|Commentary    =
}}
Expertise
| Skill name: | • {{{Skill name}}} |
| Type: | • {{{Type}}} |
| Affinity: | • {{{Affinity}}} |
| Action Type: | • {{{Action Type}}} |
| Cost: | • {{{Cost}}} |
| Description: | • {{{Description}}} |
| Commentary: | • {{{Commentary}}} |
{{Expertise
|Skill name      =
|Type              =
|Affinity           =
|Action Type     =
|Cost               =
|Description      =
|Commentary    =
}}
mttable id test for Diaspora Shinagawa keys
| Key Fragments | ||||||||||
|---|---|---|---|---|---|---|---|---|---|---|
| Fragment picture | |
|
|
|
|
|
|
|
|
|
| Fragment name | Black Fragment | Gray Fragment | Blue Fragment | Red Fragment | Yellow Fragment | Green Fragment | Orange Fragment | Purple Fragment | Four Color Fragment | Colorless Key |
| Fragment drop | Odin Vision | Thor Vision | Pillar G | Pillar F | Pillar I | Pillar H | Pillar B | Pillar A | Pillar E | (21-17),(21-20),(21-25) |
| Usage | Black Key | Gray Key | Blue Key | Red Key | Yellow Key | Green Key | Orange Key | Purple Key | Four Color Key | Item Mix with Fragments |
| Completed Keys | ||||||||||
| Key picture | |
|
|
|
|
|
|
|
| |
| Key name | Black Key | Gray Key | Blue Key | Red Key | Yellow Key | Green Key | Orange Key | Purple Key | Four Color Key | |
| Key usage | Pillar A | Pillar B | Pillar C | Pillar D | Pillar E | Pillar F | Pillar G | Pillar H | Pillar I | |
| Expertise | Attack | Dodge | Rapid | Spin | Guard | Rush | Counter | Shot | Item usage | |
Shinagawa Team Formation (Formatting)
Credit: domosquawk
IMPORTANT: Check your team number based on your spawn point labeled on the map below
| Team coordination place |
|---|
|
| Long version |
|---|
|
Team 1: Pillar D, Red Farmers and Virtue Team
Team 2: Pillar H (& B), Purple Farmers and Throne Team
Team 3: Pillar I (& A), Four-Color Farmers and Thor Team
Team 4: Pillar C & G, Orange and Blue Farmers, Dominion Team
Team 5: Pillar E, Yellow Farmers and Odin team
Team 6: Pillar F, Green Farmers and Metatron Party
Diaspora Leader
|
| Short version |
|---|
|
Team 1: Pillar D, Red Farmers and Virtue Team
Team 2: Pillar H (& B), Purple Farmers and Throne Team
Team 3: Pillar I (& A), Four-Color Farmers and Thor Team
Team 4: Pillar C & G, Orange and Blue Farmers, Dominion Team
Team 5: Pillar E, Yellow Farmers and Odin team
Team 6: Pillar F, Green Farmers and Metatron Party
|